Post to Office Topic
Excel is the most popular spreadsheet application that are embedded with advanced security features to protect the user's data from unauthorized access. You can set an open password for entire workbook or protection password for worksheet. If you are trying to make some change to a protected worksheet, the following error message will appear:

But sometimes it can be a thorn in side for the authorized users if they could not remember the password of protected worksheet. So, if you also are in the same situation, then don't worry at all as here you will get the best 4 ways to unprotect an Excel worksheet without knowing the password.
VBA is the inbuilt tool of MS Office suite that will help you manipulate Excel worksheet programmingly. This includes micro code to unprotected Excel worksheets without password. Though, this is a traditional method but gives a good result. The detailed steps for the process are listed below and you will input a few lines of VBA codes, so make sure to copy and paste the same code appropriately.
Step 1: Open your password protected excel sheet, then press Alt and F11 keys together. This step will open the VBA and using the same, you will bypass the unprotected excel sheet. If you don't know the open password, please refer to this guide to crack Excel password.
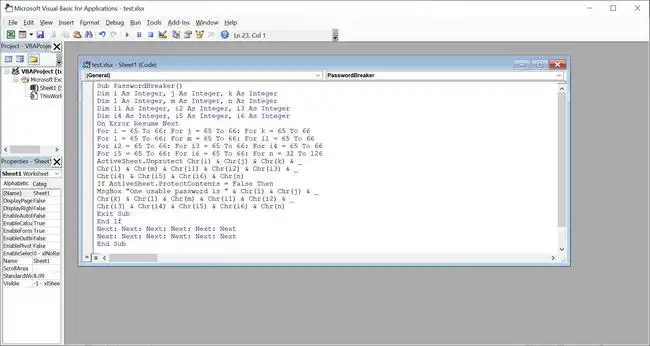
Step 2: On the left side of the VBA window, you will get the list of sheets, select the protected excel sheet and then double click on it. Thereafter, a blank sheet will appear on your screen and you just need to enter the commands listed below.
Sub PasswordBreaker
Dim i As Integer, j As Integer, k As Integer
Dim l As Integer, m As Integer, n As Integer
Dim i1 As Integer, i2 As Integer, i3 As Integer
Dim i4 As Integer, i5 As Integer, i6 As Integer
On Error Resume Next
For i = 65 To 66: For j = 65 To 66: For k = 65 To 66
For l = 65 To 66: For m = 65 To 66: For i1 = 65 To 66
For i2 = 65 To 66: For i3 = 65 To 66: For i4 = 65 To 66
For i5 = 65 To 66: For i6 = 65 To 66: For n = 32 To 126
ActiveSheet.Unprotect Chr(i) & Chr(j) & Chr(k) & _
Chr(l) & Chr(m) & Chr(i1) & Chr(i2) & Chr(i3) & _
Chr(i4) & Chr(i5) & Chr(i6) & Chr(n)
If ActiveSheet.ProtectContents = False Then
MsgBox "One usable password is " & Chr(i) & Chr(j) & _
Chr(k) & Chr(l) & Chr(m) & Chr(i1) & Chr(i2) & _
Chr(i3) & Chr(i4) & Chr(i5) & Chr(i6) & Chr(n)
Exit Sub
End If
Next: Next: Next: Next: Next: Next
Next: Next: Next: Next: Next: Next
End Sub
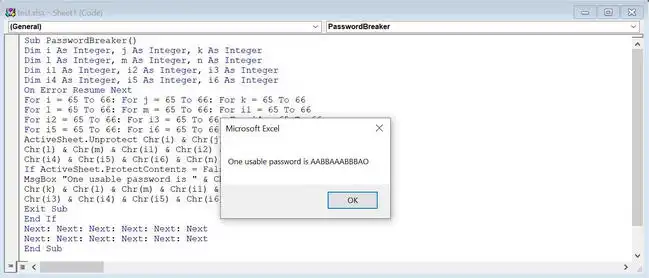
Step 3: After completing the above task, click on the run button that is symbolized with a forward arrow and is located at the top of the menu bar.
Step 4: Unpon success, you will receive a confirmation message, saying 'One usable password is AABBAAABBBA0'. Your job is done and now can easily access the unprotect excel sheet on your computer without a password.
Well, this is the conventional method to unprotect a worksheet and it is easy to try out. However, if you are using Excel 2016 or higher version, then this trick won't give you positive result. So, at this point, you can go with the smart tool that can perform the task without any commands and the action time will be very less and it is called PassGeeker for Excel.
It is always recommended to take advantage of use-friendly and efficient tool to perform such an advanced task. In this case, it is PassGeeker for Excel, one of the most powerful tools to remove protection from Excel worksheet without damaging the file. The algorithm is best in class that simplifies your work more efficiently. It can unlock any worksheet in a few seconds. And this is the best part of this awarding-winning software. Now, go through the steps listed below to leanr how to PassGeeker for Excel for unprotecting worksheet without password.
Download Now Download Now
Step 1: First, you need to downloadPassGeeker for Excel on your PC and install it. The official download link is provided above. After installing the application, hover your mouse cursor to the icon of PassGeeker for Excel, right-click on it and then choose an option 'Run as administrator'.

Step 2: When the application is launched and two options are presented on your computer. They are 'Recover Open Password from Excel' and 'Remove Workbook, Worksheet Password'. Select the second one for unprotecting Excel worksheet.
Step 3: After that, you will get additional options at the top of the menu bar, click on 'Add file' to upload the protected Excel sheet into the program.
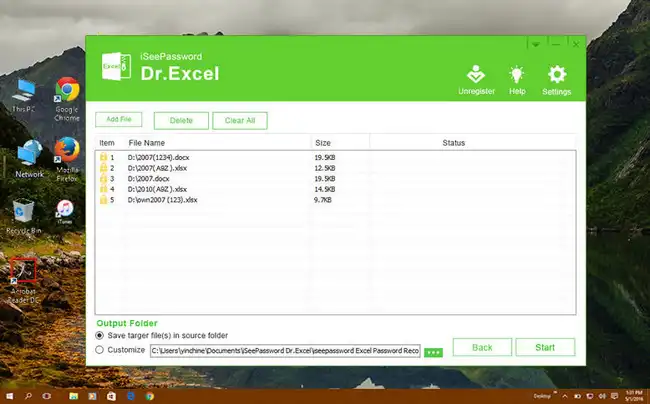
Step 4: Now, move to the bottom interface here you will get the Output Folder section, click on the Customize radio button to pick up a destination folder to save the unlocked file.
Step 5: Click on the 'Start' button and the process will get completed in seconds. After that, you will get the confirmation message on the screen and thereafter, you can access the protected Excel sheet without any password.
The application, PassGeeker for Excel is a great tool that can break password from protected excel sheet or workbook. Apart from removing the password, it can also recover the password. So, if the first method fails to give the result, then go with PassGeeker for Excel to accomplish the task in a more comfortable way.
Download Now Download NowZip is a widely used file format and can it can be opened by WinRAR or 7-Zip tools, which will also helps to extract the files from zip file. One hidden feature of those file archiving tool is to unprotect Excel worksheet without a password. Though the method is a bit lengthy but deliver a happy outcome.
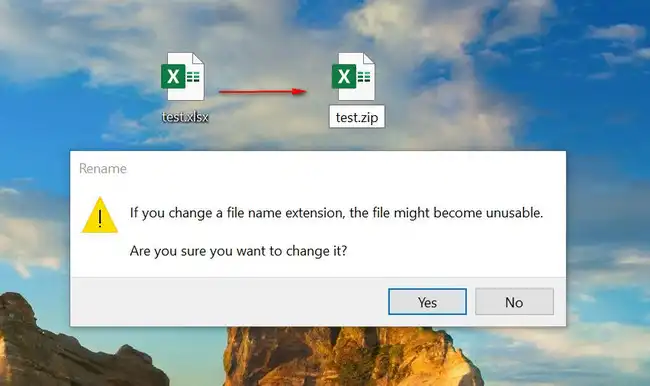
Step 1: Locate the Excel sheet that is password-protected, right-click on it, and then choose rename. Here, you need to change the extension of the respective file to zip format.
Step 2: After that, unzip the excel sheet with application that supports zip format. The file structure is shown as follows:
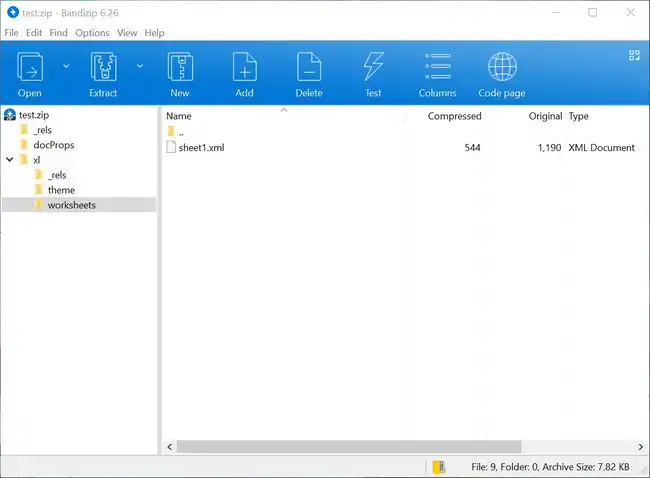
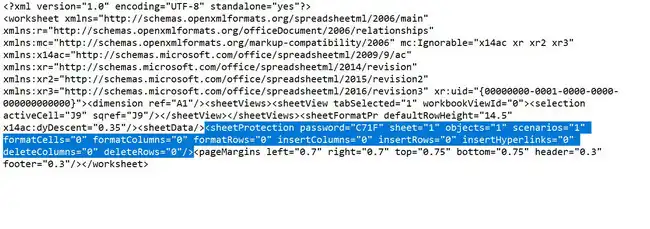
Step 3: Now, open sheet1.xml file with notepad and then navigate to the 'sheetProtection'. After that, delete the tag completely. Make sure to delete only sheetProtection tag, not the entire row. After completing the task, save the file and further rename the same to excel format, i.e. xlsx.
This trick is quite effective but you need to perform multiple tasks if the Excel file has more than one sheet. Moreover, you will have to repeatedly change the file extension. So it still works but not recommended!
If the protected Excel worksheet is password protected and the restriction is for editing only, then this tip will help you to unprotect a worksheet. In this method, you will have to copy the data from the entire sheet and then paste it on another sheet.
Step 1: You need to open the password-protected worksheet on a computer.
Step 2: Now, select all the cells from the excel sheet by pressing Ctrl & a together, and after that copy those items by pressing Ctrl & c together.
Step 3: After that, open a new excel sheet and then paste the entire cells that you copied from the protected sheet by pressing Ctrl & v together. Now, you can modify the protected sheet in new sheet as it is now unprotected.
This method has some limitations as it works on a hit and trial basis. If in the beginning, Excel asks for the password, then this method won't work and you won't be able to unprotect the worksheet as expected.
All the methods covered in this post are useful and the final result depends upon what kind of version and protection from the Excel file. There is no loss to try all of them as you don't have to pay a cent. However, if you are using MS Office 2007 or below, then VBA will be good for you. But, if the version is above, means MS Office 2016 or 2019, then PassGeeker for Excel will be more suitable for you.